Setup help
Adding an extension to ChatGPT
The Steps for ChatGPT button on an extension’s page takes you to the right part below. Where it only works in Codex, that button reads Steps for Codex. Codex in the terminal is at the bottom.
Using Claude? See the steps for Claude.
Checked on
From ChatGPT Plugins
Adding a plugin from ChatGPT Plugins
- Where to add it
- On chatgpt.com or in the ChatGPT app on your computer.
- Where it works
- On the website, in the apps on your phone and computer, and in Codex.
Working in the terminal? Read Codex.
Some services have an extension of their own in Claude Marketplace or ChatGPT Plugins. You look the service up and add it with one button. Not every service is in both.
- Open Plugins in the menu on the left.
- Type the service’s name in the Search plugins field.
- Click the service’s name. Its page opens.
- Click Install plugin at the top right.
- Sign in to the service if asked.
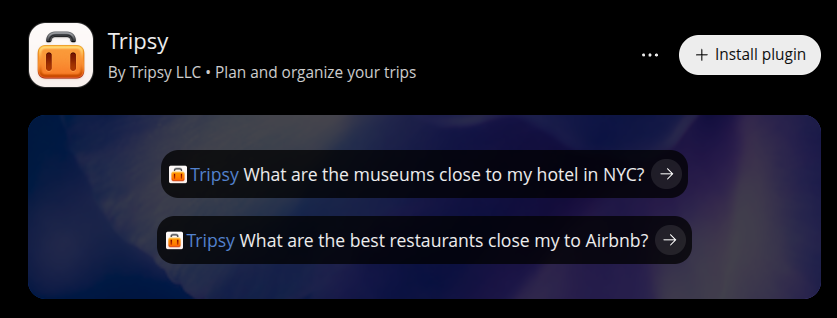
The service isn’t there? Then ChatGPT doesn’t have it. Check on the maker’s page whether it is in Claude.
Done? Then the plugin is on the Plugins page under Installed. Start a new chat: the plugin is in the menu behind + in the message box. You can also type @ and its name, and ChatGPT uses the plugin by itself when your question calls for it.
To remove it again: open Settings, choose Plugins under Integrations and pick the plugin. Uninstall plugin is there.
With an address
Adding a plugin with an address
- Where to add it
- On chatgpt.com, in your browser.
- Where it works
- On the website.
Working in the terminal? Read Codex.
A remote MCP server runs at the maker’s end, on the internet, not on your own computer. You only add its address, so you can do it in your browser. You copy the address from the extension’s page. If it names a service you sign in to there, you need an account at that service.
You need the extension’s address; a link to a GitHub project alone will not do.
- Open Plugins in the menu on the left.
- Click Add at the top right and choose Add custom MCP server.
- Enter a name under Name and paste the extension’s address into the field under Connection.
- Does the service ask for an account? Then leave Authentication on OAuth. If not, choose No authentication.
- Tick I understand and want to continue and click Create as a plugin.
- On the Plugins page, open the Personal tab and pick your plugin.
- Install it if ChatGPT asks you to.
- Sign in to the service if asked.
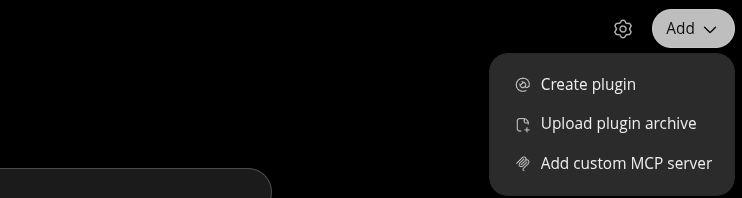
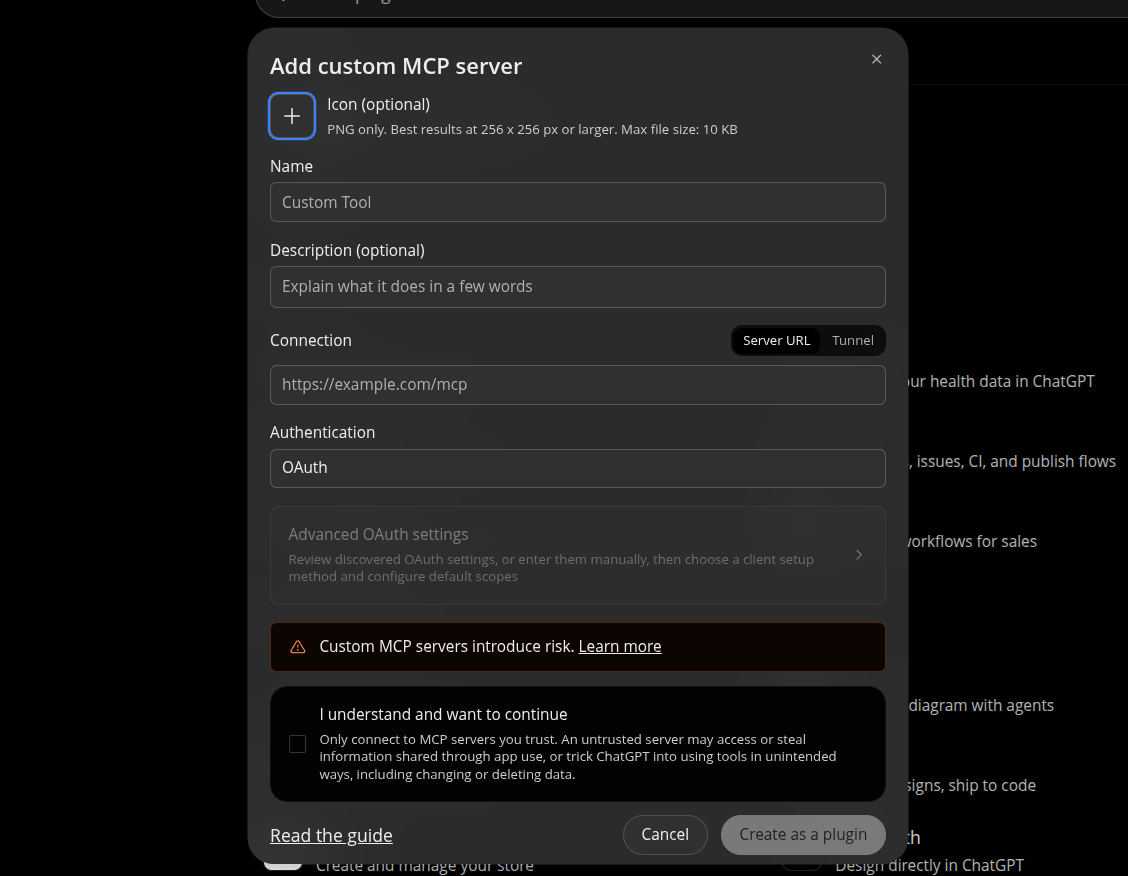
Done? Then the plugin is on the Plugins page under Installed. Start a new chat: the plugin is in the menu behind + in the message box. You can also type @ and its name, and ChatGPT uses the plugin by itself when your question calls for it.
Don’t see Add custom MCP server? Then your plan or workspace does not allow it. On a work account, your admin decides.
Does the extension’s page say Local or remote under Runs? Then the same server can also run on your own computer. How that works is in adding a local MCP server.
Local MCP server
Adding a local MCP server
- Where to add it
- In the ChatGPT app on your computer.
- Where it works
- In Codex: in the app and in the terminal.
Working in the terminal? Read Codex.
A local MCP server is a program that runs on your own computer. So you add it to an AI on that computer.
Does the maker also provide an MCP address? Follow the steps in adding a plugin with an address instead.
The ChatGPT app on your computer shares these settings with Codex. The command is behind the Go to the maker button. What has to be on your computer first is under Requires on the extension’s page.
- Open Settings from your profile at the bottom left and choose Plugins, under Integrations.
- Click Add at the top right and choose Add MCP server.
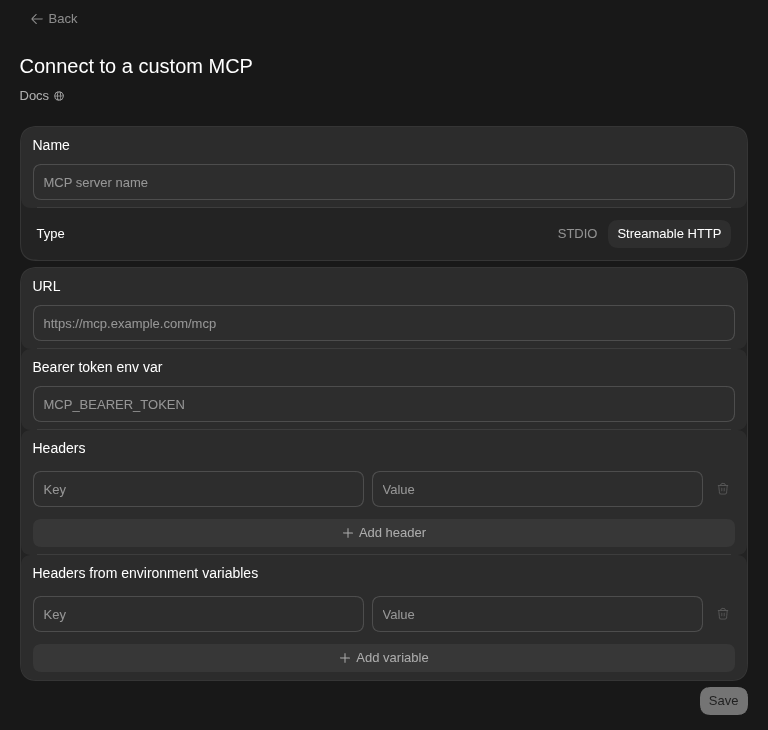
- Enter a name under Name and leave Type on STDIO.
- Enter the first word of the maker’s command under Command to launch, and each further part as a line of its own under Arguments.
- Click Save.
- Then choose Restart. If the server asks for an account, also choose Authenticate.
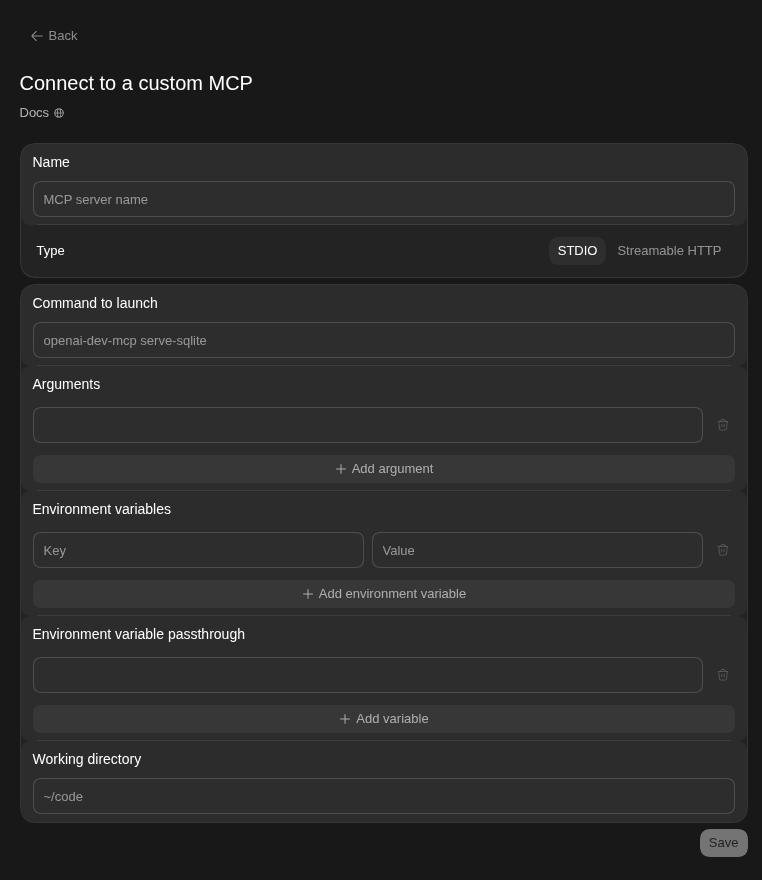
Under Type you can also choose Streamable HTTP, for a server that has an address of its own. You then enter the address under URL. Under Bearer token env var you enter the name of an environment variable, not the key itself. That form has no sign-in screen: if the server asks for an account, follow the steps in adding a plugin with an address.
Skill
Adding a skill
- Where to add it
- On chatgpt.com. In the app on your computer it also works, through a folder.
- Where it works
- On the website, and in the app on your computer if you use the folder.
Working in the terminal? Read Codex.
A skill is a set of instructions your AI reads. Nothing is connected and no server runs: it is a folder of text that your AI picks up when your question calls for it. If a skill also ships scripts, your AI runs them itself.
Download the skill from the maker’s page: the ZIP or skill file, or on GitHub through the green Code button and Download ZIP. Check that the maker names ChatGPT: a skill made for another AI does not always work as is.
- Open Plugins in the menu on the left and choose Skills at the top.
- Click Add at the top right and choose Upload from your computer.
- Choose the skill’s file.
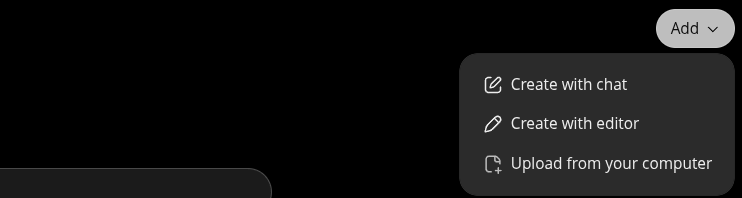
ChatGPT checks the skill first; it may then show Needs Review or Blocked. Once it is added, ChatGPT uses it by itself when your question calls for it, or you type @ and its name.
Don’t see Skills or Upload from your computer? Then your plan or workspace does not allow it.
The ChatGPT app on your computer also reads skills from the folder ~/.agents/skills/ in your home folder, the same folder as Codex: put the skill’s folder there. If you don’t see it straight away, restart the app. A skill you upload on chatgpt.com does not always show up in the app too.
Plugin from a marketplace
Adding a plugin from a marketplace
- Where to add it
- In the ChatGPT app on your computer.
- Where it works
- In Codex: in the app and in the terminal.
Working in the terminal? Read Codex.
A plugin is a bundle from the maker: one or more skills, sometimes with an MCP server too. The maker puts their plugins in a marketplace, a list on GitHub. You first add that marketplace, then pick the plugin. The maker’s page says what the two are called.
You name a marketplace by where it lives on GitHub, in the form owner/repo. That is not always where the plugin itself lives: use what the maker names.
- Open the ChatGPT app on your computer and choose Plugins in the menu on the left.
- Click Add at the top right and choose Add a marketplace.
- Under Source, enter the maker’s marketplace as
owner/repo. Leave the other fields empty unless the maker names something for them. - Click Add marketplace.
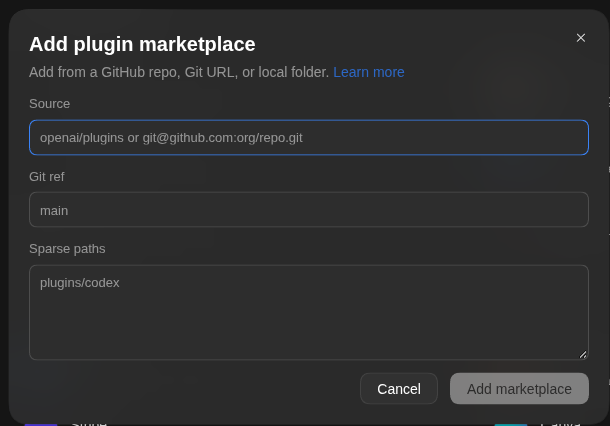
Then choose the marketplace in the list of plugins and install the plugin.
Does the plugin also bring agents or hooks? Not every AI uses those. Check the maker’s instructions for which AI supports the whole bundle.
The maker’s work folder
Opening a work folder
- Where to add it
- In Codex, in the ChatGPT app on your computer.
- Where it works
- On that computer, in that folder.
Working in the terminal? Read Codex.
A work folder is a maker’s folder you work in with your AI. It holds instructions, and often skills, that your AI reads as soon as you start it in that folder. That works in Claude Code and Codex, in the apps on your computer too.
Read on the maker’s page what the folder does. What has to be on your computer first is under Requires on the extension’s page. Your AI can start programs from the folder on your computer.
Codex reads the instructions in an AGENTS.md file. A folder with only a CLAUDE.md was made for Claude: check that the maker names Codex.
- Download the folder from the maker’s page. If it is on GitHub, click the green Code button and choose Download ZIP.
- Unzip it.
- Open the ChatGPT app on your computer, click ChatGPT and choose Codex.
- Next to Projects, click Add new project.
- Under Source folders, pick the folder you unzipped and click Create project.
- Start a chat in that project.
- Type what the maker names first.
Done? Then Codex reads the maker’s AGENTS.md and the skills in the .agents/skills folder. You pick a skill by typing $.
Codex (in the terminal)
Working with Codex in the terminal? Then you add every kind of extension with a command or a folder in the right place.
From ChatGPT Plugins
Codex uses the same plugins as ChatGPT, and you open them with /plugins. Look the service up and install the plugin.
With an address
Copy the MCP address from the extension’s page and run this command in the terminal. Replace NAME with a short name without spaces and ADDRESS with the address:
codex mcp add NAME --url ADDRESSThat puts the server in all your projects: the command writes to ~/.codex/config.toml. The command cannot limit it to one folder. For that, put the server in .codex/config.toml in that folder yourself; Codex reads that file only in a project you trust:
[mcp_servers.NAME]
url = "ADDRESS"
If the service asks for an account, sign in through your browser:
codex mcp login NAMEThat only works for a service with OAuth sign-in. If the maker asks for an API key, follow the maker’s instructions. Type /mcp in Codex to see whether the server is connected.
To remove it again, with the same name you used when adding it:
codex mcp remove NAMEIf it is in .codex/config.toml in a folder, remove it from there.
Local MCP server
What has to be on your computer first is under Requires on the extension’s page. The command is behind the Go to the maker button. Put codex mcp add NAME -- in front of it, with a name of your choice:
codex mcp add NAME -- COMMANDThat puts the server in all your projects: the command writes to ~/.codex/config.toml.
If the server asks for an account or API key, follow the maker’s instructions. Type /mcp in Codex to see whether the server is connected.
To remove it again, with the name you chose:
codex mcp remove NAMEIf it is in .codex/config.toml in a folder, remove it from there.
Skill
A skill is a folder with a SKILL.md file in it. There is no command to add one: you put the folder in the right place.
- In
~/.agents/skills/for all your projects. - In
.agents/skills/inside a project, for that project only.
Or let Codex do it: copy the link to the maker’s page, paste this request and replace SOURCE_LINK with that link. Codex first asks whether the skill goes in this folder only or in all your projects.
Add the skill from SOURCE_LINK following the maker’s instructions. First ask which skill and where: this folder or all my projects. Give me the skill name.Type /skills in Codex to see whether the skill is listed. If it is not there straight away, restart Codex.
Removing it is deleting the folder again.
Plugin from a marketplace
First add the maker’s marketplace, with OWNER/REPO as the maker names it:
codex plugin marketplace add OWNER/REPOCodex then reports the marketplace’s name. Type codex plugin list to see which plugins are in it, and add the plugin:
codex plugin add PLUGIN@MARKETPLACECodex also takes a marketplace the maker made for Claude Code.
To remove it again:
codex plugin remove PLUGIN@MARKETPLACEThe maker’s work folder
Get the folder the way the maker describes, go into it and start Codex. Replace FOLDER with that folder’s name:
cd FOLDER
codex
Codex then reads that folder’s AGENTS.md and the skills in its .agents/skills/; it does not read a CLAUDE.md. Type /skills to see the skills.